Hey so in this tutorial we are going to learn how to create a crud application from the scratch…
First thing is we need to create a project in visual studio.After creating the project we need to connect it to a database, But before that we need to add nuget package as well…
Microsoft.EntityFrameworkCore
Microsoft.EntityFrameworkCore.SqlServer
Microsoft.EntityFrameworkCore.Tools
In order to do that we need to create a Data folder in our project first and create a AppDbContext class. and you need to create a model lets say the name of the mdoel is Student and the code inside the model is
using System.ComponentModel.DataAnnotations;

namespace databasetest.Models
{
    public class Student
    {
            [Key]
            public int Id { get; set; }
            public string Name { get; set; }
            public string Email { get; set; }


    }
}
and AppDbContext
using DemoCms.Models;
using Microsoft.EntityFrameworkCore;

namespace DemoCms.Data
{
    public class AppDbContext : DbContext
    {
        public AppDbContext(DbContextOptions<AppDbContext> options)
            : base(options)
        {
        }

        public DbSet<Student> Students { get; set; }
    }
}
. Configure connection string in appsettings.json
Open appsettings.json and add your connection string:
at the top of the file
{

  "ConnectionStrings": {
    "DefaultConnection": "Server=localhost;Database=DemoCms;User Id=sa;Password=YourStrong!Pass123;TrustServerCertificate=True;"

  },


  "Logging": {
    "LogLevel": {
      "Default": "Information",
      "Microsoft.AspNetCore": "Warning"
    }
  },
  "AllowedHosts": "*"
}
And now in Program.cs we need to write…
using DemoCms.Data;
using Microsoft.EntityFrameworkCore;

var builder = WebApplication.CreateBuilder(args);


// Register DbContext with SQL  when connecting to db 1st step
builder.Services.AddDbContext<AppDbContext>(options =>
    options.UseSqlServer(builder.Configuration.GetConnectionString("DefaultConnection")));

// Use this in autherisarion as well when connecting to db 2nd step...
builder.Services.AddAuthorization();


// Add services to the container.
builder.Services.AddControllersWithViews();

var app = builder.Build();

// Configure the HTTP request pipeline.
if (!app.Environment.IsDevelopment())
{
    app.UseExceptionHandler("/Home/Error");
    // The default HSTS value is 30 days. You may want to change this for production scenarios, see https://aka.ms/aspnetcore-hsts.
    app.UseHsts();
}

app.UseHttpsRedirection();
app.UseRouting();

app.UseAuthorization();

app.MapStaticAssets();

app.MapControllerRoute(
    name: "default",
    pattern: "{controller=Home}/{action=Index}/{id?}")
    .WithStaticAssets();


app.Run();
Now to migrate this : Add-Migration "Initialmigration"
and update-database

lets start the rest of the process...
Lets make a controller first shall we, Lets name is StudentController and
and inside the StudentController we need to put the following codes
using DemoCms.Data;
using Microsoft.AspNetCore.Mvc;
using DemoCms.Models;
using Microsoft.EntityFrameworkCore;

namespace DemoCms.Controllers
{
    public class StudentController : Controller
    {


        // Dependency Injection of AppDbContext
        //Dont forget to add the using statement for DemoCms.Data
        //This  is the must add code
        private readonly AppDbContext _context;
        public StudentController(AppDbContext context)
        {
            _context = context;
        }


        //  This will just get the students from the database
        // GET: Student
        public async Task<IActionResult> Index()
        {
            var students = await _context.Students.ToListAsync();
            return View(students);
        }

    }
}
and After this you can manually add some fields to the database and see the result in index.cshtml make sure to make a Student folder inside the View.else it wont work.
@model IEnumerable<DemoCms.Models.Student>

@{
    ViewData["Title"] = "Students List";
}

<h2>Students List</h2>

<table class="table table-striped">
    <thead>
        <tr>
            <th>Id</th>
            <th>Name</th>
            <th>Email</th>
            <th>Actions</th>
        </tr>
    </thead>
    <tbody>
        @foreach (var student in Model)
        {
            <tr>
                <td>@student.Id</td>
                <td>@student.Name</td>
                <td>@student.Email</td>
                <td>
                    <a asp-action="Details" asp-route-id="@student.Id">Details</a> |
                    <a asp-action="Edit" asp-route-id="@student.Id" class="btn btn-warning btn-sm">Edit</a>

                    <a asp-action="Delete" asp-route-id="@student.Id">Delete</a>
                </td>
            </tr>
        }
    </tbody>
</table>

<a asp-action="Create" class="btn btn-primary">Add New Student</a>
and You have to figure out How to make it come in the front end just work with shared_layout and program.cs OK now I am going to have lunch. since I woke up at 1 PM today and its been like 2:24 and I am hungry as well, I will come back and complete this.
Hey I am back and I had lunch as well.. Now lets continue
After index method and index view Next we want to create , The Create controller and view,
So the create controller goes like this :
// GET: Student/Create
       public IActionResult Create()
       {
           return View();
       }


       // POST: Student/Create
       [HttpPost]
       [ValidateAntiForgeryToken]
       public async Task<IActionResult> Create(Student student)
       {
           if (ModelState.IsValid)
           {
               _context.Add(student);
               await _context.SaveChangesAsync();
               return RedirectToAction(nameof(Index));
           }
           return View(student);
       }
And the create View goes like this:
@model databasetest.Models.Student

<h2>Add New Student</h2>

<form asp-action="Create">
    <div class="form-group">
        <label asp-for="Name"></label>
        <input asp-for="Name" class="form-control" />
        <span asp-validation-for="Name" class="text-danger"></span>
    </div>

    <div class="form-group">
        <label asp-for="Email"></label>
        <input asp-for="Email" class="form-control" />
        <span asp-validation-for="Email" class="text-danger"></span>
    </div>

    <button type="submit" class="btn btn-primary">Save</button>
</form>
Yep. Now we will work on edit controller and edit view…
So the controller code goes like this:
// GET: Student/Edit/5
public async Task<IActionResult> Edit(int? id)
{
    if (id == null)
    {
        return NotFound();
    }

    var student = await _context.Students.FindAsync(id);
    if (student == null)
    {
        return NotFound();
    }
    return View(student);
}

// POST: Student/Edit/5
[HttpPost]
[ValidateAntiForgeryToken]
public async Task<IActionResult> Edit(int id, Student student)
{
    if (!ModelState.IsValid)
    {
        return View(student);
    }

    var existingStudent = await _context.Students.FindAsync(id);
    if (existingStudent == null)
    {
        return NotFound();
    }

    // Update only the fields you allow editing
    existingStudent.Name = student.Name;
    // existingStudent.OtherProperty = student.OtherProperty;

    await _context.SaveChangesAsync();
    return RedirectToAction(nameof(Index));
}
And the Edit view goes like this::
@model DemoCms.Models.Student

<h2>Edit Student</h2>

<form asp-action="Edit" method="post">
    @Html.AntiForgeryToken()

    <input type="hidden" asp-for="Id" />

    <div class="form-group">
        <label asp-for="Name"></label>
        <input asp-for="Name" class="form-control" />
        <span asp-validation-for="Name" class="text-danger"></span>
    </div>

    <div class="form-group">
        <label asp-for="Email"></label>
        <input asp-for="Email" class="form-control" />
        <span asp-validation-for="Email" class="text-danger"></span>
    </div>

    <button type="submit" class="btn btn-primary">Save</button>
    <a asp-action="Index" class="btn btn-secondary">Cancel</a>
</form>

@section Scripts {
    @{
        await Html.RenderPartialAsync("_ValidationScriptsPartial");
    }
}
Now finally we need delete view and delete controller….
Delete controller goes like this
// GET: Student/Delete/5
public async Task<IActionResult> Delete(int? id)
{
    if (id == null)
    {
        return NotFound();
    }

    var student = await _context.Students
        .FirstOrDefaultAsync(m => m.Id == id);

    if (student == null)
    {
        return NotFound();
    }

    return View(student); // Show a confirmation page
}

// POST: Student/Delete/5
[HttpPost, ActionName("Delete")]
[ValidateAntiForgeryToken]
public async Task<IActionResult> DeleteConfirmed(int id)
{
    var student = await _context.Students.FindAsync(id);
    if (student != null)
    {
        _context.Students.Remove(student);
        await _context.SaveChangesAsync();
    }
    return RedirectToAction(nameof(Index));
}
And the delete View is
@model DemoCms.Models.Student

<h2>Delete Student</h2>

<h3>Are you sure you want to delete this student?</h3>

<div>
    <h4>@Model.Name</h4>
    <p>@Model.Email</p>
</div>

<form asp-action="Delete" method="post">
    @Html.AntiForgeryToken()
    <input type="hidden" asp-for="Id" />
    <button type="submit" class="btn btn-danger">Delete</button>
    <a asp-action="Index" class="btn btn-secondary">Cancel</a>
</form>
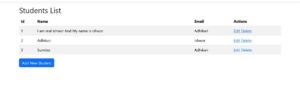
I think this is it… This is how you can make a CRUD app in ASP.NET Core. I will put a picture of final product right below